
Eldorado Stone loves helping clients choose the perfect stone veneer for their remodeling projects. A stone veneer wall is an incredible addition to any area of any style home, and there are countless options for you to choose from on our online gallery.
Installing a stone or brick veneer wall can be a DIY project and we have complete installation instructions for you to read on our website. It’s important to understand the work that goes into creating new stone walls, and after you’ve browsed our gallery, you’re sure to find a few possibilities for your home. The finished results of a stone wall remodel can be truly breathtaking.
Design Choices
Of course, you’re going to want to choose the best stone for your design and location. As part of this decision, you'll want to consider the stone shape, color, and texture. Once you’ve made your selection and decided which stone to use and where, follow the installation instructions on our website to learn how to correctly install your new stone walls.
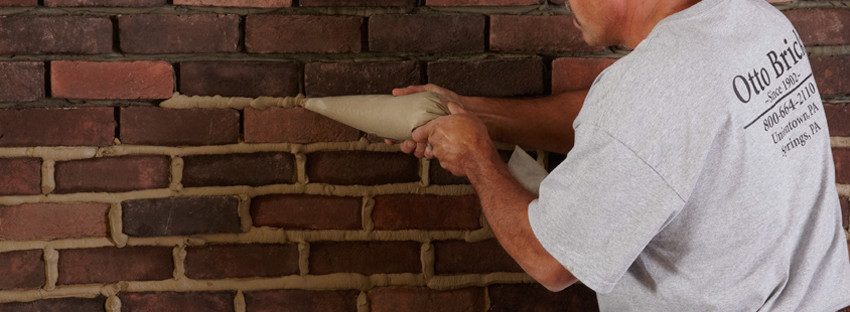
The grout you select (if applicable) will impact the final appearance of a stone veneer wall, so make your grout color and grout technique selections with this in mind. Always create a small mock up of your stone with the final grout color and technique before beginning your installation. The impact of grout should not be underestimated, so it's important to know a bit before you begin.
Grout Color
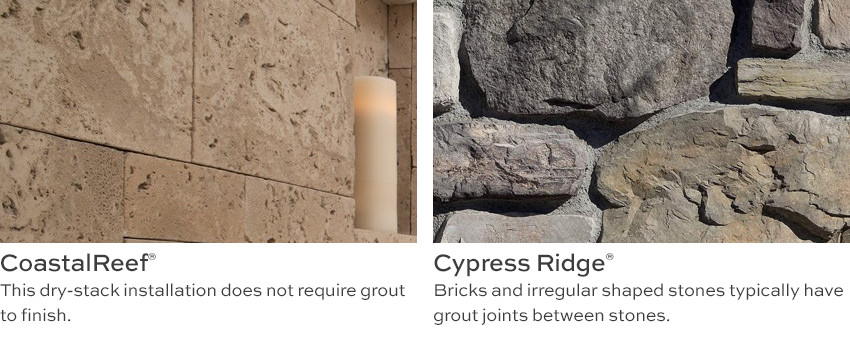
Eldorado Stone carries several types of stone veneer in a variety of colors. When installing stone or brick with a grout joint, you'll need to choose a grout color and technique to finish the job. For example, low-profile, flatter stones, like our CoastalReef are dry-stacked tightly together and don't require grout. However, the TundraBrick shown above has a grout joint and requires grout to fill in the joints.
If you opt for a stone with a grout joint, the grout is going to play a critical role in the final appearance of your stone or brick wall. Deciding between a contrasting grout color versus a blending grout color dramatically changes the finished appearance. For example, a contrasting light color grout used with Ashland TundraBrick, a dark grey brick, will highlight each brick individually. Where a grey grout with the same product will blend the grey bricks together creating a more uniform darker wall.
The grout color is only half of the grout story. The various grout techniques are the finishing touch.
Grout Techniques
The day your stone veneer wall is finished, it can look modern and clean or rustic and old based on the grout technique you choose. Picking your grout technique according to the design style you're trying to achieve is an important step in the process. Again, tighter fitting stones like our CoastalReef will eliminate grout, while stones, such as Fieldledge, look amazing with an over-grout technique.

Once you've selected your grout color and your grout technique, you need to install your stones correctly to accomplish your desired look. When installing your stone, be sure to to consider the size of the grout joint between the stones. As a standard, the width of your finger is about the right grout joint size for a brick or other rectangular stone shapes. With an irregular stone shape, like Cypress Ridge shown above, the grout joint will vary based on how tightly the stones fit together during installation.
Over-grouting is accomplished by spreading the grout over the outer fine edges of the stones. This blends the stone and grout together softening the overall look of the wall while increasing the role the grout plays in the final color and appearance of the wall. A standard grout technique strikes back the grout from the face of the stone and exposes the stone edges adding more definition, depth, and shadow play to your stone walls.
Joints and Finishing Touches
After you selected your stone, grout color, and technique, there's one more variable to consider before you start your installation. Your finishing technique. This describes how you will finish the grout after you fill the grout joints. For example, if you selected a standard grout technique, you will fill the grout joints to a point below the face of the stones. Next, you will wait for the grout to be "thumbprint" dry, meaning that you can press your thumb into the grout and leave a clean thumbprint. At this point, you have one more decision to make about the finishing touches. The most common technique for a standard grout installation would be to strike the grout joint with a pointing tool to uniformly spread the grout into the joint. This completes your standard grout installation.
If you want the best possible results, Eldorado Stone recommends ordering samples of the stones you are considering and doing some test grouting before committing to anything. This way, you can have a better idea of how you’ll need to grout and how the finished product will look.
With the right stone, the right grout, and the proper preparation and technique, your new stone wall can be the new architectural centerpiece of your home.


Let Us Know What You Thought about this Post.
Put your Comment Below.